Create your own blade.

This user has no status.
Member
Jun 2016
257
291
2,385
bobpuls, I have some more questions:

You said you preglued three ply's of popular veneer. I was wondering how that's usually done. The directions of the grains of the tree ply's are all the same? Or the second ply is glued with the grains perpendicular to the first ply's grains?

Different types of glue can affect the play characteristics of the blade?

Did you ever had warping with one of your blades?

Despite I started to play table tennis just a short time ago, it feels pretty tempting to try to make my own blade. I already have most of the tools that you use, but apparently there's still quite a bit of research to be done.
 

MDP

This user has no status.

MDP

This user has no status.
Member
Oct 2015
234
223
475
Read 1 reviews
Here are my newest blades. They still need some finishing work, but I thought I'd share them with you guys already.
The 2 blades are like 2 brothers, similar in most aspects but slight differences in construction. One has slightly thicker core and the other has slightly thicker outer veneers. I allso tried 2 different glues.

After the ball bounce test, the sound is high pitch, so I believe they will be rather fast.

IMG_3291e.jpg
IMG_3297e.jpg
 
This user has no status.
Member
Jun 2016
257
291
2,385
Nice work MDP, these look really nice. When you're going to put them to the real test?

Does a multi layered handle makes a noticeable difference compared to a handle from one piece? What types of glue did you use?

I guess it must be really satisfying, playing with your own made blade.
 

MDP

This user has no status.

MDP

This user has no status.
Member
Oct 2015
234
223
475
Read 1 reviews
Nice work MDP, these look really nice. When you're going to put them to the real test?

Does a multi layered handle makes a noticeable difference compared to a handle from one piece? What types of glue did you use?

I guess it must be really satisfying, playing with your own made blade.
This evening will be the first test.

Everything you change will make a difference, if this difference is noticable depends on the amount of change and the sensitivity of the player. So I can't really say that a layered handle is better or worse, or that the difference is noticable. There are just too many parameters to take into consideration and these aren't measurable/comparable.

The primary reason I mostly use layered handles, is because of the weight and feel. And I just like the classic style of handles.
 
  • Like
Reactions: bobpuls
This user has no status.
Member
Jun 2016
257
291
2,385
Looking forward to hear the test results :).

I think both types of handles can look pretty good. I wouldn't know the difference in feeling, since I only have one blade (so far).

Suitable types of wood are easily obtainable in Belgium? I've been looking for Limba and Abachi, it took me a while to find some (Dutch) webshops that sell it.

I want Dan to review these!!!
That would be really cool, really wonder how they compare to the (sometimes overpriced) factory made blades.
 
Last edited:

MDP

This user has no status.

MDP

This user has no status.
Member
Oct 2015
234
223
475
Read 1 reviews
Obtaining wood in small quantities and without having to own a full woodworking shop to get them into usable sizes is not easy. I find it quite a hassle and most shops are really expensive and always seem to not exactly have what you are looking for. But in some smaller woodshops or modelling shops you can find some stuff to work with.
 

MDP

This user has no status.

MDP

This user has no status.
Member
Oct 2015
234
223
475
Read 1 reviews
Both are birch but one is rather blueish grey and has less lines in it. Looking only at the veneer, the brightest one is the most beautifull, but in the combination with the handle, the grey/blue is really nice.

Just played 1,5h with the blades and I liked them alot. Comparing them with my osp virtuoso off-, I feel that they are in the category OFF, speedwise. One is a bit faster then the other. They both have a rather high pitched sound. So me and my training partner had a bit of trouble adjusting to them in the short game. But there are many possible reasons for this : rubbers were freshly glued so a bit more bouncy, it's been a month since we played, use of celluloid ball, use of different rubbers, a bit more afraid to smash these blades against the table,... etc :D

The handle is a bit thicker but felt quite natural. Allthough I made the handle a bit shorter than usual, the balance of the blade is still very centered and the shorter handle wasn't that noticable for me.
The blue/greyish blade has a bit more feeling, so I liked it the most (resembling the virtuoso), but I noticed that despite lesser feeling, my shots with the other blade were just as good. My training partner liked the blade with less feeling better. So it's all down to preference.
 
  • Like
Reactions: UpSideDownCarl
says Hi In first i want to thank you for your interest...
Well-Known Member
Feb 2015
1,437
920
5,341
Read 6 reviews
bobpuls, I have some more questions:

You said you preglued three ply's of popular veneer. I was wondering how that's usually done. The directions of the grains of the tree ply's are all the same? Or the second ply is glued with the grains perpendicular to the first ply's grains?

Different types of glue can affect the play characteristics of the blade?

Did you ever had warping with one of your blades?

Despite I started to play table tennis just a short time ago, it feels pretty tempting to try to make my own blade. I already have most of the tools that you use, but apparently there's still quite a bit of research to be done.
yes usually you have to change the direction on each layer of ply to achieve good bound and better stiffness by 90 degrees. but in some cases you do not have to ... it depends on the current composition.

And yes each type ow glue is affecting playing characteristics.
No i did not have warping of my blades, but i have some issues with carbon with balsa .
.... Do not be worry and try to make one blade of your own ... you will find with time the best combinations of the wood to achieve the desired speed or feeling.
I wish you luck.
 
  • Like
Reactions: Suga D and Jirrex
says Hi In first i want to thank you for your interest...
Well-Known Member
Feb 2015
1,437
920
5,341
Read 6 reviews
Here are my newest blades. They still need some finishing work, but I thought I'd share them with you guys already.
The 2 blades are like 2 brothers, similar in most aspects but slight differences in construction. One has slightly thicker core and the other has slightly thicker outer veneers. I allso tried 2 different glues.

After the ball bounce test, the sound is high pitch, so I believe they will be rather fast.

IMG_3291e.jpg
IMG_3297e.jpg
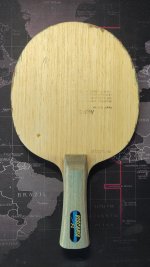
Yes i like them keep continuing... however the birch is better to be used as second ply ...for the top is it a little bit crisp. But some people like it this way.
 

MDP

This user has no status.

MDP

This user has no status.
Member
Oct 2015
234
223
475
Read 1 reviews
Yes it is indeed quite crisp.

I've had another session with the 2 blades and the differences between the two are starting to stand out more and more.
They both have some more 'crisp' than I'm used to, but the blueish/grey one feels pretty close to my virtuoso.
The other birch blade due to using epoxy glue, kind of reminds me of my old carbon blade. Less feeling, more speed. Not completely the same, but the difference between wood glue and epoxy glue are noticable.
 
This user has no status.
Member
Jun 2016
257
291
2,385
yes usually you have to change the direction on each layer of ply to achieve good bound and better stiffness by 90 degrees. but in some cases you do not have to ... it depends on the current composition.

And yes each type ow glue is affecting playing characteristics.
No i did not have warping of my blades, but i have some issues with carbon with balsa .
.... Do not be worry and try to make one blade of your own ... you will find with time the best combinations of the wood to achieve the desired speed or feeling.
I wish you luck.

Thank you bobpuls, in the meantime I gathered quite a bit of information so I think now I have a pretty good idea how to start.
 
  • Like
Reactions: Suga D
says Hi In first i want to thank you for your interest...
Well-Known Member
Feb 2015
1,437
920
5,341
Read 6 reviews
Interesting to see, bobpuls.

To stitch the two core plies together, you use the same glue as for stitching the veneer (what kind of waterbased glue you're using)?

Did you already finish the whole blade or you just completed the gluing process?

i`m using wood glue (water based ) for dynamic connections (like rocking chair or etc. ) the brand is irrelevant ..because in each country it is different ...
But i`m using this one :Rakoll Express 25 Plus
I just completed the gluing process ... i`m now creating multiple blades .. so first gluing them all and them cutting them all.
 
  • Like
Reactions: Jirrex
This user has no status.
Member
Jun 2016
257
291
2,385
i`m using wood glue (water based ) for dynamic connections (like rocking chair or etc. ) the brand is irrelevant ..because in each country it is different ...
But i`m using this one :Rakoll Express 25 Plus
I just completed the gluing process ... i`m now creating multiple blades .. so first gluing them all and them cutting them all.

Looking forward to see the result :)
 
This user has no status.
Member
Sep 2016
350
539
1,080
Here is first video of series
Make your own blade at home.
update:
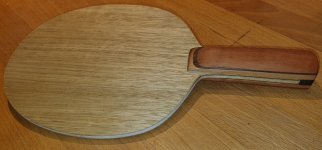
ok for this compositions i have used :
first ply it was actually already preglued 3 ply`s veneers of poplar 0.8mm
second was the core 4mm balsa standard weight
then carbon layer
and the final it was mahogany ply 0.6 mm
the white/yelow glue is D2 wood glue (water base ) for dynamic connections (like rocking chair or etc. ) which is better for keeping the wood dynamic characteristics
the second transparent glue is epoxy glue ....

this is actually second version of the blade ... before it was used 6mm light balsa core which was by the customer reviewed ass little bit small response wood. so he decide this 4mm change .
one think you have to count in more layers blade which are glued with water based glue ... the wood get wet , soft and it starts to curling after a while .... so be careful
before you are applying the final pressure.

Ok here is the second part ... Cutting


I was using Makita 3709 Trimmer with home made simple table ....
Please if you will try to cut it by your self ... feed the router counter clockwise like i have started ...
do not feed it clock wise (like i have ) because if you not hold it hard enough the bit will "eat it" and you will destroy the blade and you can loose some of your fingers or other injury can happen .
As you can see the hardest part is to remove protective sheet from the double sided duct tape... ;-)
video is 1.5 time faster then original time
And i forgot to show you how to remove the template .... do not try to tear it from the blade ... just cut the duck tape in the middle with knife and then with fingers friction movement get rid of the duck tape ... then just sanding of the edges ... and it is done and ready for next step.
And do not do it in closed room .. as you can see it is very dusty .... i have to do it because outside was raining and customer is not patient enough ...
I forgot to mention the templates .... I drew the templates in ilustrator and exported it into .DXF and .DWG files .. then i have them watercut for 13 Euro ... into 1 cm komatex . the handle has separated template ... which is at the front and the end larger ....
Hope you like it

update 3
here are the final steps to finish the blade...


update ...
gluing of another blade with carbon and off + speed

Grat video, really clear and inspiring me to try a carbon layer. It would be great to see how you make and shape your handles.
 
Top