This user has no status.
This user has no status.
Member


Hi everyone!
I’m Corey, a designer by trade, and I had some high-quality Sugar Maple and Walnut furniture veneers (0.5mm tangential cut) lying around the workshop. I looked at them and thought: "Why not build a blade?". I wanna share with you guys and maybe inspire a blade making community.

materials that will go into the blade got stacked first and measure the thickness.
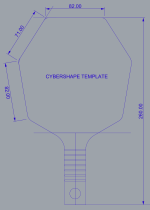
I wanted something that didn't exist: The shape of a Cybershape (reusable rubber across all my blades, the speed of a modern 7-ply, but the authentic soul of an instrument.)
The "True Luthier" Concept: Nittaku Violin is a legend, but as a woodworker, I always found it funny that it uses White Ash and Ayous—woods you rarely find in a real orchestra. I wanted to build a blade using the actual construction of a violin:
The Build Specs

hide glue before putting layer on

a rough caul i made
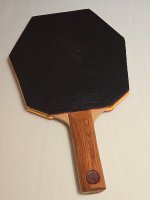
The Handle: "Soulspin Style" I made an ST (Straight) handle, but shaped it asymmetrically (inspired by Soulspin handles) to fit the natural curve of the palm.


The Performance
The Setup


What's Next? I’m currently experimenting with synthesizing my own glue. My goal is to dissolve Fish Bladder Pellets into a TEMPO Cellulose Nanofiber (CNF) solution. Theoretically, this "Bio-Nanocomposite" should provide the stiffness and speed of Carbon, but with the natural touch of wood.
I’ve made quite a few blades before this one. If you guys are interested, I can share more of my builds!
I’m Corey, a designer by trade, and I had some high-quality Sugar Maple and Walnut furniture veneers (0.5mm tangential cut) lying around the workshop. I looked at them and thought: "Why not build a blade?". I wanna share with you guys and maybe inspire a blade making community.
materials that will go into the blade got stacked first and measure the thickness.
I wanted something that didn't exist: The shape of a Cybershape (reusable rubber across all my blades, the speed of a modern 7-ply, but the authentic soul of an instrument.)
The "True Luthier" Concept: Nittaku Violin is a legend, but as a woodworker, I always found it funny that it uses White Ash and Ayous—woods you rarely find in a real orchestra. I wanted to build a blade using the actual construction of a violin:
- Maple (Used for the back of a violin).
- Spruce (Used for the soundboard/top of a violin).
- Hide Glue (The only glue allowed in high-end luthiery).
The Build Specs
- Adhesive: titebond hide glue
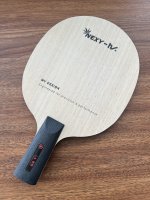
- Outer: Sugar Maple (tangential cut, all opthers are quarter saw). I sanded this down to 0.2mm to retain the wood feel and touch.
- Force Layers: Spruce 0.6mm + Horizontal Spruce 0.7mm.
- Core: 1mm Hinoki stacked 3 times (3mm total).
- Structure: It is essentially a structural hybrid of a Darker 7P-2A (Hinoki soul) and a Stradivarius Cello (Maple/Spruce body).
hide glue before putting layer on
a rough caul i made
The Handle: "Soulspin Style" I made an ST (Straight) handle, but shaped it asymmetrically (inspired by Soulspin handles) to fit the natural curve of the palm.
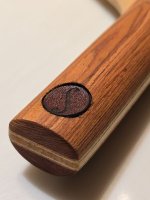
- The Detail: The "f-hole" logo isn't ink or wood—it’s Laser-Cut Leather.
- Why Leather? It matches the Hide Glue (animal protein) theme perfectly!
The Performance
- Speed: It’s not as fast as a Cybershape Carbon. But it has much Higher Arc (higher than clipper). It is more controlled than a Stiga Clipper on soft touches, but when you hit hard, it engages the Hinoki core and becomes faster than a Clipper with a distinct "Clicky" sound.
- Feel: Because the outer Maple is sanded so thin (0.2mm), the touch is amazing. I can chop and push with precision, but the ball "jumps" up powerfully on loops with a high arc. It feels like "Automatic Aiming", very forgiving.
The Setup
- Weight: 94g (Blade) / 186g (Total).
- Rubbers: I raided my spare parts drawer! T-Mount KTS Platz (Forehand) and AK47 Yellow (Backhand).
What's Next? I’m currently experimenting with synthesizing my own glue. My goal is to dissolve Fish Bladder Pellets into a TEMPO Cellulose Nanofiber (CNF) solution. Theoretically, this "Bio-Nanocomposite" should provide the stiffness and speed of Carbon, but with the natural touch of wood.
I’ve made quite a few blades before this one. If you guys are interested, I can share more of my builds!
Attachments
Last edited: